

Susan is a groomer who works with Renee at Quick Paws. She has an eight-year old dachshund named Rusty. I believe she has only had him for a year or two, so she adopted him as an adult dog.
Anyway, Rusty has a problem with damaging her apartment while she is gone to work, so he currently can’t be indoors alone while she is gone. With the weather turning colder, this was getting to be a big problem.
Renee came to the rescue by building Rusty a cozy, well-insulated doghouse last weekend. We have many of our own projects that need to get done, but this is one that really made a difference for one cute little dog. The project had the added benefit of using up numerous leftover building materials
Renee did most of the work on this one herself; I only helped out towards then end, when we wrapped things up with the roof. Unfortunately I didn’t get many pictures of this project in progress.
Framing the House and Building Walls
Renee used scrap wood to build a frame for the dog house. She designed it with a little peaked roof, sort of like Snoopy’s house. Since this is for a little dog, she ripped the scrap 2x4s (that is, cut them longways) for the frame.

Birdmouth cuts in the rafters
She did nice little birdmouth cuts for the rafters.
Then she cut foam insulation to size and placed it in the frame. At this point, it would have looked like a little house with white foam walls. She then covered up the sides with the leftover OSB sheathing.

View of the interior with lots of insulation

Insulation still exposed before all the sheathing was installed

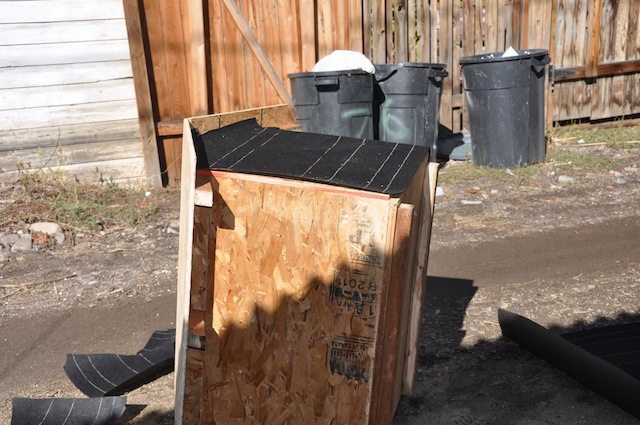
Cutting the opening
She cut a small opening in the front for the door with a jigsaw, keeping it small to keep as much heat inside as possible.
Weatherproofing the House
Tar-papering the walls
This house needs to be nice and watertight to keep Rusty warm and dry. We had leftover tarpaper from the Great Cat Room Remodel. So she cut pieces of that and used the staple gun to attach them to all sides of the house, as well as the roof.
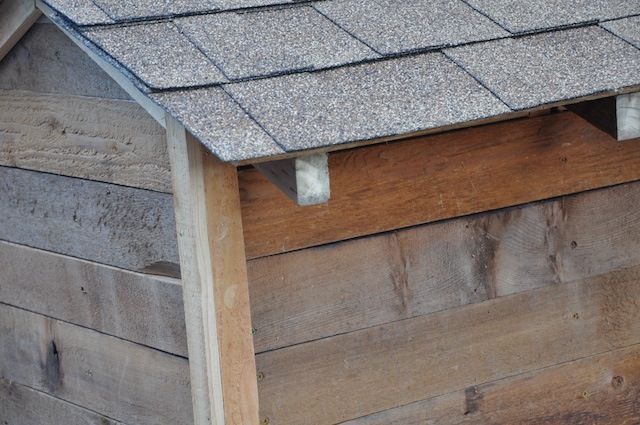
But a good well-built house needs good, attractive siding. Fortunately we had a big stack of cedar planks that served well as siding. She attached these using long screws.

The old Grizzly Fence countertop that provided the wood for Rusty's dog house
The wood siding was another recycled material. Renee started grooming at Quick Paws back in the spring of 2010. At the time, Quick Paws had just moved into their new location, which used to belong to Grizzly Fence. The room that was to become the groom shop had a large, old countertop covered with cedar fence pickets. We pulled all those old pickets off and removed the countertop to make room for grooming, but Renee anticipated that this wood might come in handy and saved it.
These cedar pickets were substantial, so adding them as siding quickly made the whole house very heavy.
Roofing and Finishing Up
Finally, the house needed a good roof. Unfortunately, we didn’t have any more of the Ondura roofing panels from the Great Cat Room Remodel. We had already donated the leftovers to Home Resource.
So we ended up going back to Home Resource and buying some regular house shingles. We actually bought more than we needed, but it was only $5. They charge $1 per vertical inch of shingles, so I guess we had a 5-inch tall stack of shingles.
The advantage is, this would make the dog house look more like a real house.
I helped with the roof. I was a little surprised to find myself pounding roofing nails again…I had really thought that the cat room remodel was the end of my roofing career. At least for this one there was no danger of slipping and falling off. Although I did have to stand on my toes to reach the nails up near the top of the ridge.
Shingling the roof
Working with the shingles was pretty easy. They were already the perfect width for the little house, so I just laid them on one after another, starting from the bottom. After placing the first shingle, overlapping the next one covers up the nails, so the whole roof looks nice.

Ridge cap from the side
For the top, we used more shingles to create a ridge cap. The ridge cap is intended to cover the joint where the two sides of the roof meet. There are pre-made ridge caps you can use, but we decided to do the basic version. For this, I cut the shingles into 7-inch strips. Then I installed them along the top of the roof, similar to the way I installed the regular shingles. Again, adding and overlapping each new shingle over the previous one hid the previous nails. When I finished, I thought it looked a little funny because the shingles were still very stiff. However, once the house sits out in the sun and heat, the asphalt shingles should soften and “relax” a bit.
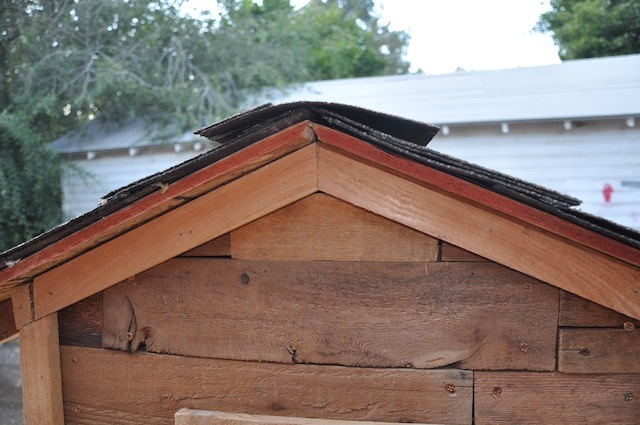
Ridge cap from the front of the house
While I worked on the roof, Renee added trim pieces around the door and on all the corners to hide the seams. We were out of the old Grizzly Fence wood by now, so we used some pickets leftover from installing our own fence last summer.
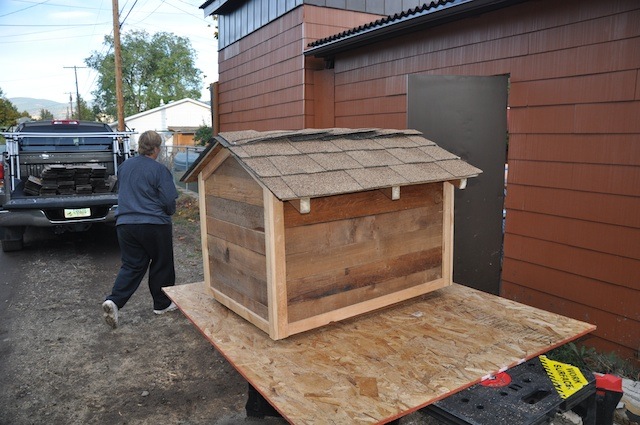
At last, the house was done! The rough wood planks gave it a nice “rustic” barn look, and I happen to think that the shingles look great.

The finished house!
Back view of the finished house!
Front view - I love the trim around the door!
Delivering the House
When we finally finished, the house was so heavy we had to back the truck right up to the workbench so we wouldn’t have to carry the house very far. We slid it up on the tailgate and carefully drove to Susan’s house; she lives just down the street so it wasn’t a very long drive.
I should have brought my camera but completely forgot. Susan and her roommate were completely blown away by the dog house. I think Susan was amazed that Renee had built something so cool over one weekend! They found a nice spot for it right by the back door.
Later in the week, Susan told Renee that Rusty loves the new house. He goes out in the back yard, does his business, and goes right into the the little house.
So I would say the Rusty’s Doghouse project was a big success!
